Queyntisen — A New Way to Code with AI in the Terminal
A few months ago I wrote a terminal editor from scratch. Its name is Queyntisen. It’s written in Python and inspired by Vim, but one thing sets it apart: natural integration with large language models (LLMs).
Imagine you’re coding and get stuck. Without leaving the editor, you can send the whole file to a model and immediately get a corrected version. That’s exactly what Queyntisen does.
Why write your own editor?
It came from a need. I use Vim and VS Code, but switching between them — especially with another window for an AI assistant — was annoying. I wanted to ask a model with one key and see the answer in the editor itself. So I sat down and built it.
Features
Modal editing (the Vim spirit)
Navigation and commands in normal mode, writing in insert mode. Almost everything familiar from Vim is here:
- Move with
hjkl(arrow keys work too) - Delete or cut a line with
dd - Copy a line with
yy - Paste with
p - Undo with
uorCtrl+Z, backed by a full history stack - Search with
/and move between matches withn/b; searching wraps at the end of the file
Split view: code and AI chat
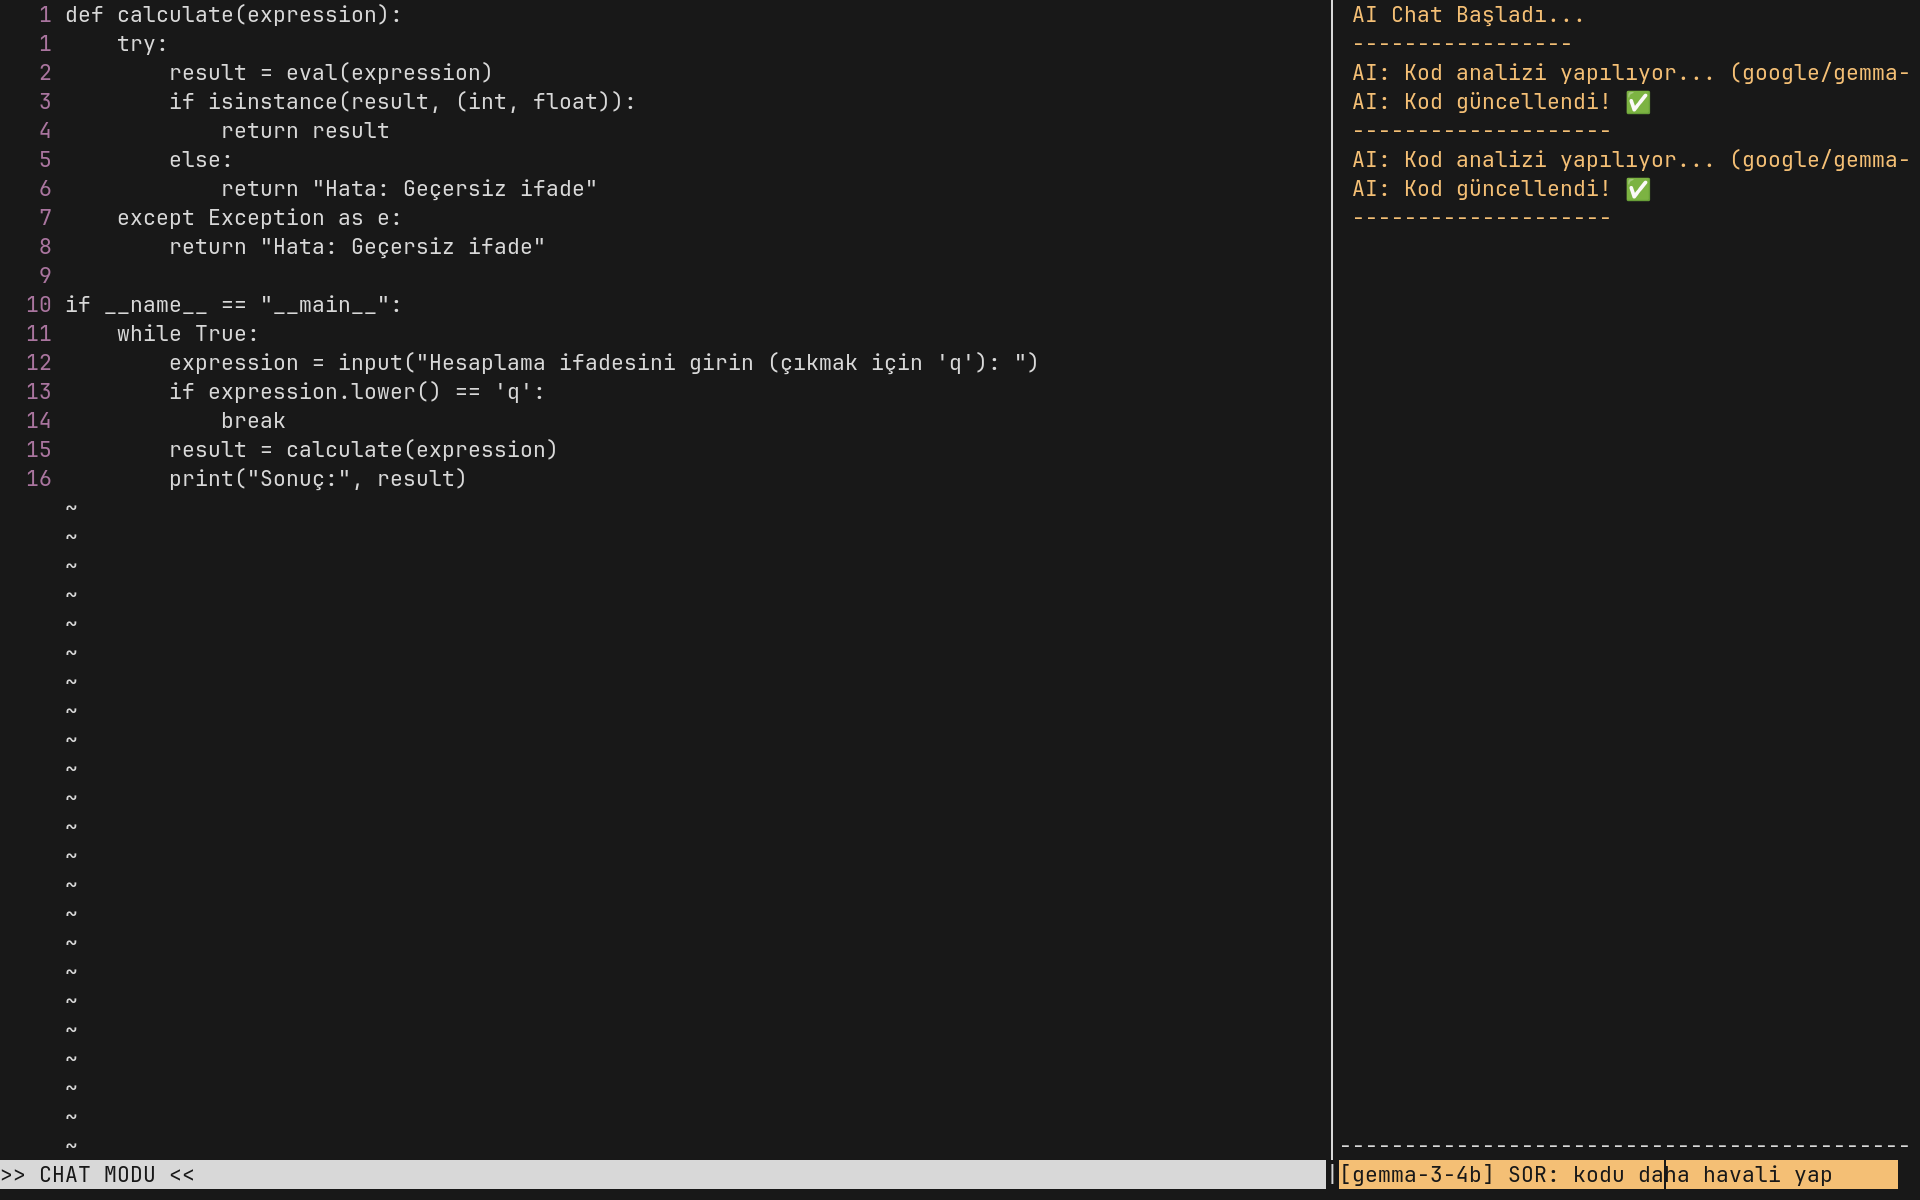
Ctrl+W switches between the code panel and AI chat. Code takes up 70% of the screen and chat 30%. Type your question in the right panel, press Enter, and the AI provides the answer.
How does the AI integration work?
The useful part is that AI work happens in the background. The editor doesn’t freeze, so you can keep typing. The flow is:
- Write your request in the chat panel (“make this function async,” “add debugging,” and so on).
- The current contents of the entire file are automatically sent to the model as context.
- The model produces code only, without explanation or Markdown, as instructed by the system prompt.
- The returned code is applied directly to the editor buffer.
It works with local models (LM Studio, Ollama) and the OpenAI API. On startup it automatically detects the connected model.
There is no separate config file, just two variables at the top of editor.py:
1
2
3
4
5
6
7
# For a local LLM (default)
API_KEY = "lm-studio"
BASE_URL = "http://localhost:1234/v1"

# For the OpenAI API
API_KEY = os.getenv("OPENAI_API_KEY")
BASE_URL = "https://api.openai.com/v1"
Syntax highlighting
Python keywords are blue, strings yellow, comments green, and numbers magenta. The palette is simple and easy on the eyes.
Line numbers
Vim users will recognize three modes:
:numara goreli— shows distance from the cursor (Vim’srelativenumber):numara normal— shows actual line numbers:numara yok— hides line numbers
Mouse support
You can click to place the cursor. Clamping at line ends and margin calculation are handled too.
Smart Backspace and Tab
Tab inserts four spaces. Backspace removes all four at once if exactly four spaces sit to the left of the cursor. It’s a small detail that makes typing nicer.
Installation
One command is enough:
1
2
3
4
git clone https://github.com/fMert/Queyntisen.git
cd Queyntisen
chmod +x install.sh
./install.sh
The script creates a Python virtual environment, installs the openai library, adds the queyntisen command to PATH, and updates .bashrc, .zshrc, or .profile. Reopen the terminal and run queyntisen file.py.
Requirements: Python 3.8+ and the openai library. That’s all.
What’s missing?
This isn’t a finished product. It’s an experimental project that still lacks:
- Visual mode for selection and batch editing
- Multiple-file support (buffer switching or tabs)
- Language-aware highlighting; it currently relies on regular expressions
- Keyword highlighting for languages other than Python
- Saved chat history
Still, it works. I’ve used it for my small scripts for a few months now.
Why “Queyntisen”?
Queyntisen is a Middle English word meaning “to dress up; to adorn with fine clothing.” It comes from queyntise (“skill, subtlety, elegance”) and the infinitive ending -en.
The idea of an editor “adorning” code and making it more capable with AI makes the name fit. It also sounds good and is distinctive.
Source code
The project is open source on GitHub under GPL v3. It is a single file, editor.py (about 870 lines). You’re welcome to explore, fork, and contribute.